고정 헤더 영역
상세 컨텐츠
본문
✔ Location 객체
현재 브라우저에 HTML 문서의 주소를 얻거나, 브라우저에 새 문서를 불러올 때 사용
http://koreaitac.co.kr/renewal2021/community/interview_view.asp
------- ------------- ------------------------------------------
protocol hostname pathname
protocol: 콜론을 포함하는 http, https, fth 등 프로토콜 정보를 반환
hostname: 호스트의 이름과 포트번호를 반환
pathname: URL 경로부분의 정보를 반환
href: 페이지 URL 전체 정보를 반환 또는 URL을 지정하여 페이지를 이동
reload(): 새로고침
<!DOCTYPE html>
<html lang="en">
<head>
<meta charset="UTF-8">
<meta http-equiv="X-UA-Compatible" content="IE=edge">
<meta name="viewport" content="width=device-width, initial-scale=1.0">
<title>Location객체</title>
</head>
<body>
<h2>Location객체</h2>
<script>
console.log(`현재 문서의 URL 주소: ${location.href}`)
console.log(`현재 문서의 protocol: ${location.protocol}`)
console.log(`현재 문서의 hostname: ${location.hostname}`)
console.log(`현재 문서의 pathname: ${location.pathname}`)
function sendit(){
}
</script>
<p><button onclick="sendit()">이동</button></p>
</body>
</html>


history 객체
- 브라우저의 히스토리 정보를 문서와 문서 상태 목록으로 저장하는 객체
- 사용자의 개인 정보를 보호하기 위해 이 객체의 대부분의 기능을 접근제한
back(): 페이지 뒤로 이동
forward(): 페이지 앞으로 이동
go(0): 새로고침(location.reload()와 같은 기능)
<!DOCTYPE html>
<html lang="en">
<head>
<meta charset="UTF-8">
<meta http-equiv="X-UA-Compatible" content="IE=edge">
<meta name="viewport" content="width=device-width, initial-scale=1.0">
<title>history</title>
</head>
<body>
<h2>history</h2>
<button onclick="history.back()">뒤로</button>
<button onclick="history.forward()">앞으로</button>
<button onclick="history.go(0)">새로고침</button>
</body>
</html>
 history - Chrome 2023-04-07 16-25-51.mp4
15.87MB
history - Chrome 2023-04-07 16-25-51.mp4
15.87MB
navigator 객체
브라우저 공급자 및 버전 정보 등을 포함한 브라우저에 대한 정보를 저장하는 객체
geolocation: GPS정보를 수신하는 프러퍼티
<!DOCTYPE html>
<html lang="en">
<head>
<meta charset="UTF-8">
<meta http-equiv="X-UA-Compatible" content="IE=edge">
<meta name="viewport" content="width=device-width, initial-scale=1.0">
<title>navigator</title>
</head>
<body>
<h2>navigator</h2>
<script>
const success = function(loc){
console.log(loc.coords.latitude); // 위도
console.log(loc.coords.longitude); // 경도
}
const fail = function(msg){
console.log(msg.code) //해당 메세지를 찍어줄 수 있다.
}
navigator.geolocation.getCurrentPosition(success, fail);
</script>
</body>
</html>

문서 객체 모델(Document Object Model)
- HTML문서 또는 XML문서 등을 접근하기 위한 일종의 인터페이스 역할
- 문서내의 모든 요소를 정의하고 각각의 요소에 접근하는 방법을 제공
document 객체
- 웹 페이지 자체(body)를 의미하는 객채
- 웹 페이지에 존재하는 HTML 요소에 접근하고자 할 때 반드시 document 객체로부터 시작
getElementById(): 해당 아이디의 요소를 선택
getElementsByTagName(): 해당 태그 이름의 요소를 모두 선택
getElementsByClassName(): 해당 클래스에 속한 요소를 모두 선택
getElementsMyName(): 해당 name 속성값을 가지는 요소를 모두 선택
querySelectorAll(): 선택자로 선택돠는 요소를 모두 선택
querySelector(): 선택자로 선택되는 요소를 선택
</input type="text" name="userid" id="userid">
<!DOCTYPE html>
<html lang="en">
<head>
<meta charset="UTF-8">
<meta http-equiv="X-UA-Compatible" content="IE=edge">
<meta name="viewport" content="width=device-width, initial-scale=1.0">
<title>문서 객체 모델1</title>
</head>
<body>
<h2>문서 객체 모델1</h2>
<ul>
<li name="markup">HTML</li>
<li>CSS</li>
<li id="javascript" class="js">JavaScript</li>
<li class="js">jQuery</li>
<li class="backend">Apache</li>
<li class="backend">Nginex</li>
<li id="nodejs" class="js">Node.js</li>
<li id="react" class="js">React</li>
</ul>
<script>
const tagName = document.getElementsByTagName('li');
for(let i=0; i<tagName.length; i++){
console.log(tagName[i]);
tagName[i].style.color = 'gold';
}
console.log('--------------')
const className = document.getElementsByClassName('js');
for(let i=0; i<className.length; i++){
console.log(className[i]);
className[i].style.color = 'deeppink';
}
console.log('--------------')
const id = document.getElementById('javascript')
console.log(id)
id.style.color = 'greenyellow'
console.log('--------------')
const name = document.getElementsByName('markup')
for(let i=0; i<name.length; i++){
console.log(name[i]);
name[i].style.color = 'deepskyblue';
}
console.log('--------------')
const qs = document.querySelectorAll('li.backend')
for(let i=0; i<qs.length; i++){
console.log(qs[i]);
qs[i].style.color = 'navy';
}
</script>
</body>
</html>

<!DOCTYPE html>
<html lang="en">
<head>
<meta charset="UTF-8">
<meta http-equiv="X-UA-Compatible" content="IE=edge">
<meta name="viewport" content="width=device-width, initial-scale=1.0">
<title>문서객체 모델2</title>
<script>
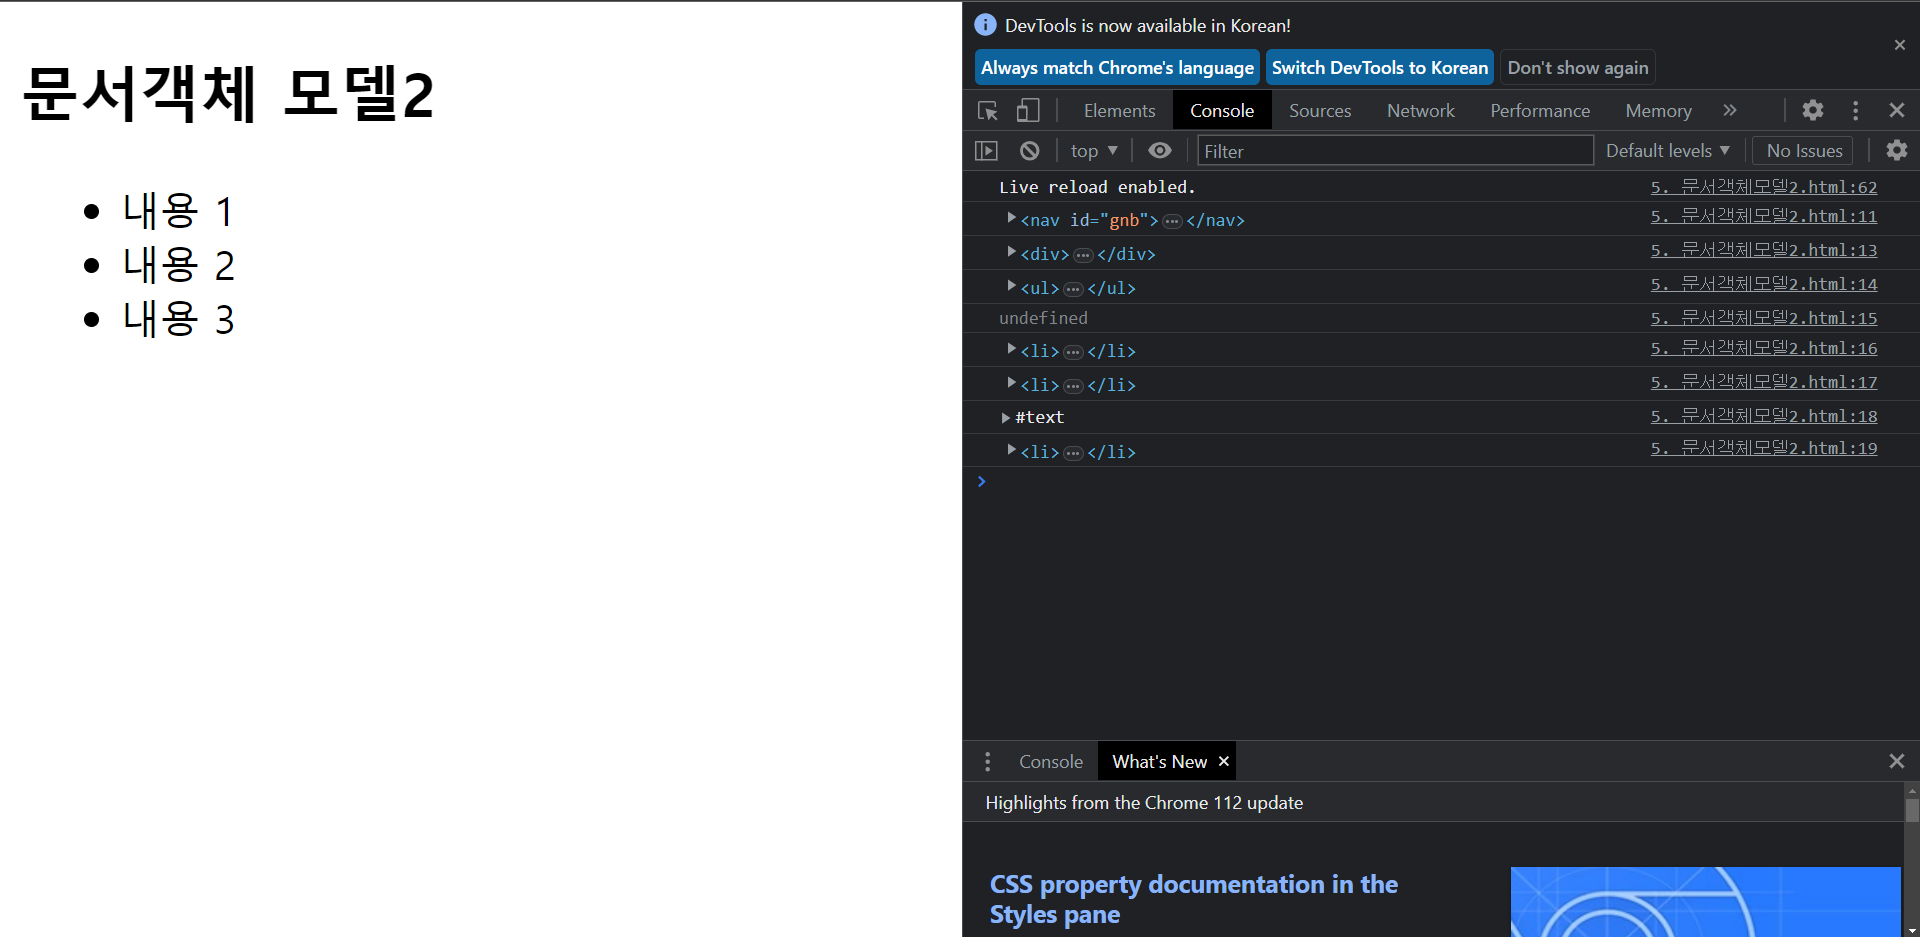
window.onload = function(){
const gnb = document.getElementById('gnb')
console.log(gnb)
console.log(gnb.parentNode)
console.log(gnb.children[0])
console.log(gnb.children[1]) // undefined
console.log(gnb.children[0].children[0]) // 내용 1
console.log(gnb.children[0].children[0].nextElementSibling) // 내용 2
console.log(gnb.children[0].firstChild) // 해당 문서노드에 엔터키를 찾음
console.log(gnb.children[0].firstElementChild ) // 내용 1
}
</script>
</head>
<body>
<h2>문서객체 모델2</h2>
<div>
<nav id="gnb">
<ul>
<li>내용 1</li>
<li>내용 2</li>
<li>내용 3</li>
</ul>
</nav>
</div>
</body>
</html>
✔ 노드(node)
HTML DOM은 노드라고 불리는 계층적 단위에 정보를 저장
노드 종류
- 문서노드: 문서 전체를 나타내는 노드
- 요소노드: HTML 요소는 요소노드, 속성노드를 가질 수 있음
- 속성노드: 속성은 모두 속성노드이며, 요소노드에 관한 정보를 가지고 있음
- 텍스트노드: 텍스트는 모두 텍스트노드
- 주석노드: 주석은 모두 주석노드
노드의 관계
parentNode: 부모 노드
children: 해당 자식들을 해당
childNodes: 자식노드 리스트
firstChild: 첫번째 자식노드(모든 노드종류를 찾아서 엔터키도 찾을 수 있음)
fistElementChild: 첫번째 자식 요소노드(무조건 태그요소만 찾아줌)
lastChild: 마지막 자식노드
nextSblibg: 다음 형제노드
previousSibling: 이전 형제노드
노드 추가
appendChild(): 새로운 노드를 해당 노드의 자식 노드 리시트 맨 마지막에 추가
insertBefore(): 새로운 노드를 특정 자식 노드 바로 앞에 추가
insertData(): 새로운 노드를 텍스트 데이터로 추가
노드 생성
createElement(): 새로운 요소 노드를 만듬
createAttrinute(): 새로운 속성 노드를 만듬
createTextNode(): 새로운 텍스트 노드를 만듬
노드 제거
removeChild(): 자식 노드 리스트에서 특정 자식 노드를 제거. 노드가 제거되면 해당 노드를 반환. 노드가 제거될 때 노드의 자식들도 다같이 제거
removeAttribute(): 특정 속성 노드를 제거
노드 복제
clonenode(): 기존의 존재하는 노드와 동일한 새로운 노드를 생성하여 반환
<!DOCTYPE html>
<html lang="en">
<head>
<meta charset="UTF-8">
<meta http-equiv="X-UA-Compatible" content="IE=edge">
<meta name="viewport" content="width=device-width, initial-scale=1.0">
<title>노드</title>
<script>
function appendNode(){
const parent = document.getElementById('list')
console.log(parent)
const newItem = document.getElementById('item1')
console.log(newItem)
parent.appendChild(newItem)
}
function insertNode(){
const parent = document.getElementById('list')
const backend = document.getElementById('backend')
const newItem = document.getElementById('item2')
parent.insertBefore(newItem, backend)
}
function appendText(){
const text = document.getElementById('text').firstChild
console.log(text)
text.insertData(7, '아주 피곤한 ')
}
function createNode(){
const newItem = document.getElementById('item1')
const newNode = document.createElement('p')
// <p> HTML </p>
newNode.innerHTML = '<b>😎 새로운 요소가 나타났다!</b>' // p태그 사이에 HTML 문장을 넣어줌
document.body.insertBefore(newNode, newItem)
}
function createAttr(){
const newItem =document.getElementById('item2')
// <p></p>
const newAttr =document.createAttribute('style')
newAttr.value = 'color:deeppink; background-color:gold;'
newItem.setAttributeNode(newAttr)
}
function createText(){
const textNode = document.getElementById('ct')
const newText = document.createTextNode('😀😴😎😋🤠🤡💩')
textNode.appendChild(newText)
}
function removeNode(){
const parent = document.getElementById('list')
const removeItem = document.getElementById('backend')
const result = parent.removeChild(removeItem)
console.log(result)
}
function removeAttr(){
const newItem = document.getElementById('item2')
newItem.removeAttribute('style')
}
function cloneElement(){
const parent = document.getElementById('list')
const originItem = document.getElementById('cl')
parent.appendChild(originItem.cloneNode(true)) // 자식이 있을 경우 자식도 복사
}
</script>
</head>
<body>
<h2 id="cl">노드</h2>
<div id="list">
<p id="backend">node.js</p>
<p>HTML</p>
<p>CSS</p>
</div>
<p id="item2">React</p>
<h3 id="item1">JavaScript</h3>
<hr>
<button onClick="appendNode()">노드추가1</button>
<button onClick="insertNode()">노드추가2</button>
<hr>
<p id="text">현재 시간은 오후 1시 30분입니다.</p>
<button onclick="appendText()">텍스트노드추가</button>
<hr>
<button onclick="createNode()">노드생성</button>
<button onclick="createAttr()">속성노드생성</button>
<button onclick="createText()">텍스트노드생성</button>
<p id="ct"></p>
<hr>
<button onclick="removeNode()">노드삭제</button>
<button onclick="removeAttr()">속성노드삭제</button>
<hr>
<button onclick="cloneElement()">노드복제</button>
</body>
</html>
<!--## 이해 잘 안됨 ##-->


✔ 정규 표현식
아이디: [ ]
* 아이디는 4자리이상, 16자리 이하
* 영문 대문자 또는 소문자로 시작해야함
이름: [ ]
* 한글만 사용
비밀번호: [ ]
* 비밀번호는 4자리 이상 또는 15자리 이하
* 대문자 1개이상, 소문자 1개이상, 숫자 1개이상, 특수문자 1개이상 꼭 들어가야 함
/ ~ / 시작과 끝
^ : 패턴의 시작
[ ] : 안의 문자를 찾음
[x-z] : x~z 사이의 문자를 하나를 찾음
x+ : x가 1번이상 반복
x$ : 문자열이 x로 끝남
^x : 문자열이 x로 시작
\d : 숫자
x{n} : x를 n번 반복한 문자를 찾음
x{n,m} : x를 n번 이상 m번 이하 반복한 문자를 찾음
<!DOCTYPE html>
<html lang="en">
<head>
<meta charset="UTF-8">
<meta http-equiv="X-UA-Compatible" content="IE=edge">
<meta name="viewport" content="width=device-width, initial-scale=1.0">
<title>정규표현식</title>
<script>
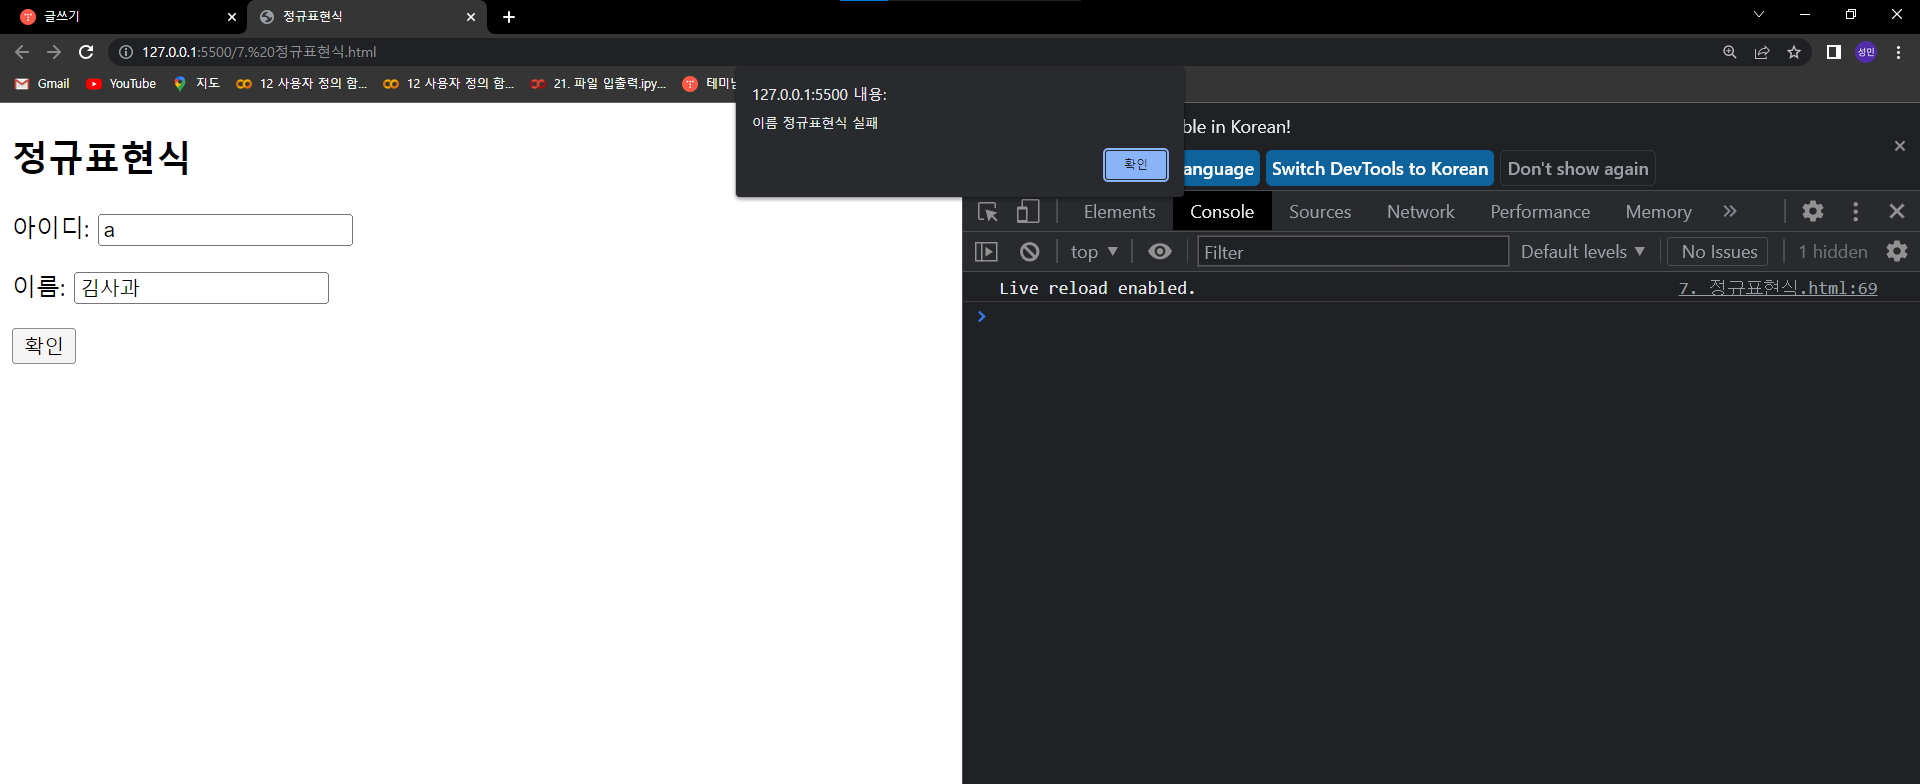
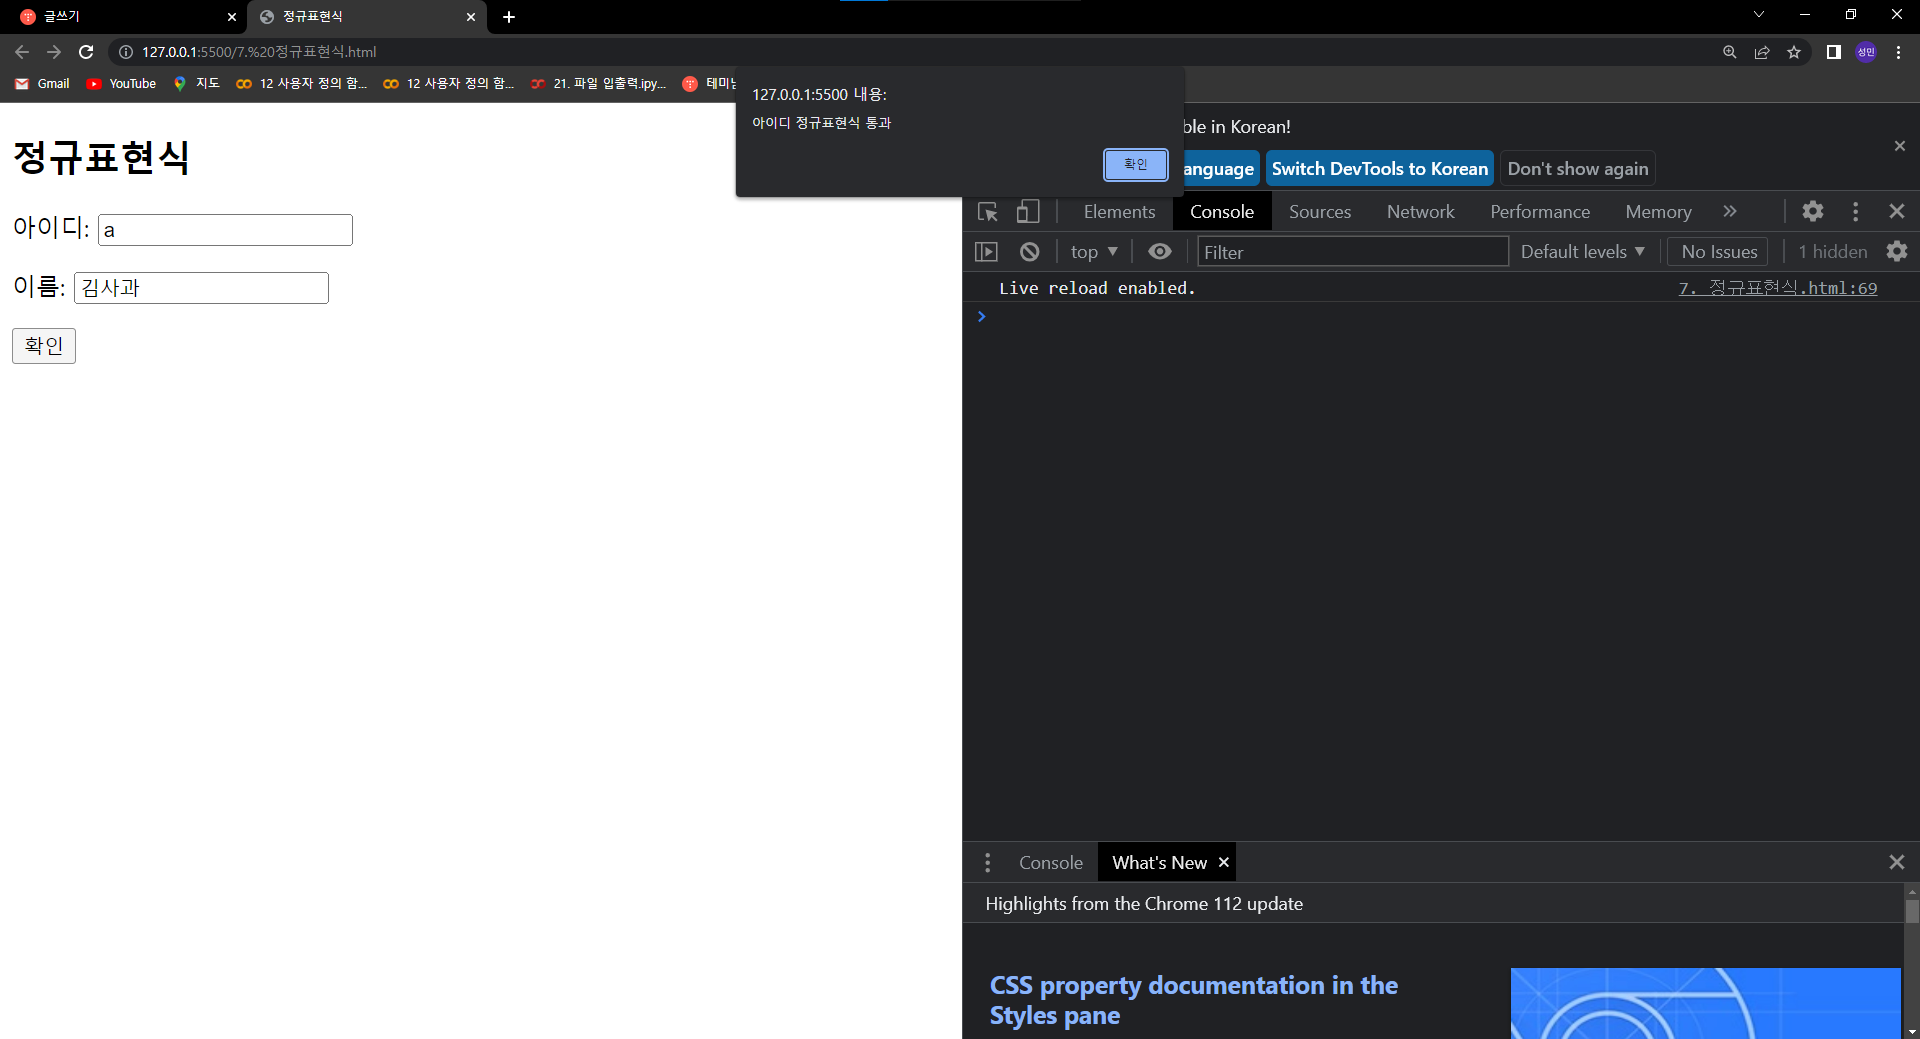
function sendit(){
const userid = document.getElementById('userid')
const username = document.getElementById('username')
// alert(userid.value)
// 정규 표현식
// 아이디
const expIdText = /^[A-Za-z]{4,20}$/
// 아이디 체크
if(expIdText.test(userid.value)){
alert('이름 정규표현식 통과')
}else{
alert('이름 정규표현식 실패')
}
// 이름
const expNameText = /^[가-힣]+$/
// 이름체크
if(expNameText.test(username.value)){
alert('아이디 정규표현식 통과')
}else{
alert('아이디 정규표현식 실패')
}
}
</script>
</head>
<body>
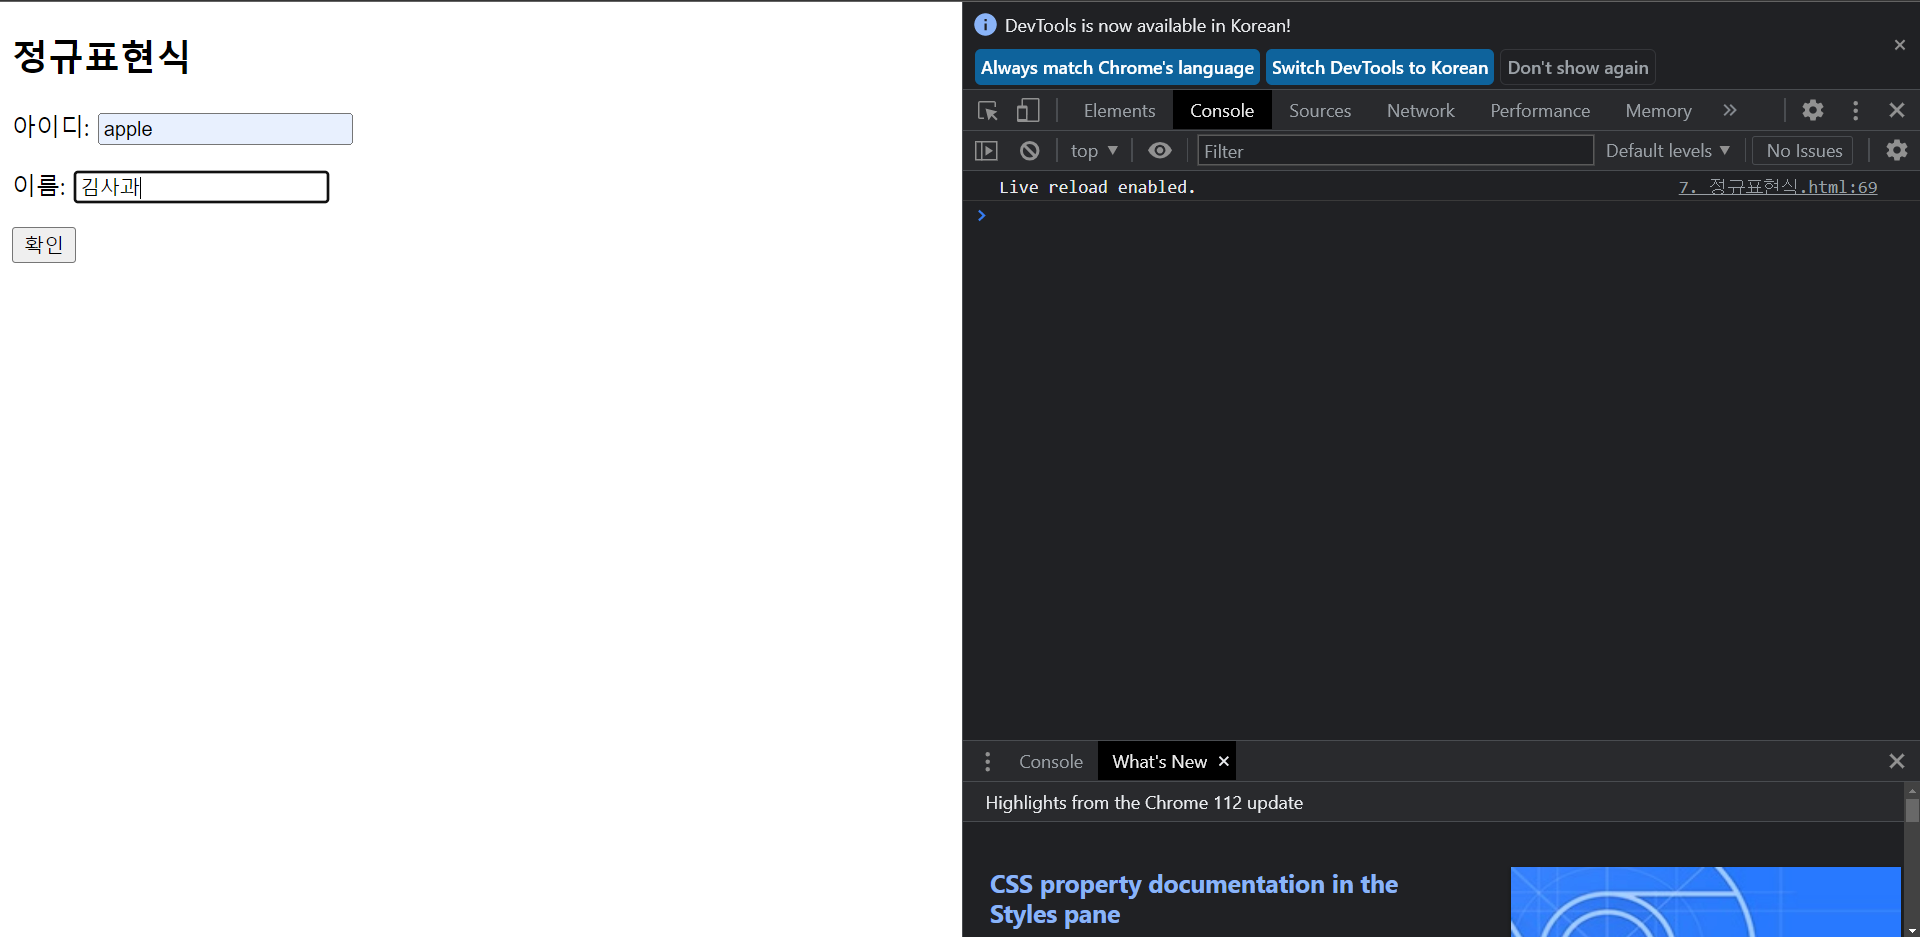
<h2>정규표현식</h2>
<p>아이디: <input type="text" id="userid"></p>
<p>이름: <input type="text" id="username"></p>
<p><button onclick="sendit()">확인</button></p>
</body>
</html>

1. 아이디
- 영문 대문자 또는 소문자로, 길이는 4~20까지 입력 가능
/^[A-Za-z]{4, 20}/
2. 이름
- 한글만 사용
/[가-힣]/+$/
3. 휴대폰 번호
- 앞번호는 3글자, -, 중간번호는 3글자 또는 4글자, - 마지막 번호는 4글자
- 010-1111-1111 또는 010-111-1111
/^\d{3}-\d{3,4}-\d{4}$/
4. 이메일
- 영문 대문자 또는 소문자 또는 숫자로 시작
- 적절한 위치에 @포함 .포함
/^[A-Za-z0-9\-\.]+@[A-Za-z0-9\-\.]+\.[A-Za-z0-9\-\.]+$/
자바스크립트 정규표현식 적용
test()
정규표현식에 대입한 문자열이 적합하면 true, 아니면 false를 리턴
<!DOCTYPE html>
<html lang="en">
<head>
<meta charset="UTF-8">
<meta http-equiv="X-UA-Compatible" content="IE=edge">
<meta name="viewport" content="width=device-width, initial-scale=1.0">
<title>회원가입</title>
</head>
<body>
<h2>회원가입</h2>
<form action="./regist" name="regform" id="regform" method="post" onsubmit="return sendit()">
<p>아이디: <input type="text" name="userid" id="userid" maxlength="20"></p>
<p>비밀번호: <input type="password" name="userpw" id="userpw" maxlength="20"></p>
<p>비밀번호 확인: <input type="password" name="userpw_re" id="userpw_re" maxlength="20"></p>
<p>이름: <input type="text" name="username" id="username"></p>
<p>휴대폰번호: <input type="text" name="hp" id="hp"></p>
<p>이메일: <input type="text" name="email" id="email"></p>
<p>성별: <input type="radio" name="gender" value="남자"> 여자<input type="radio" name="gender" value="여자"></p>
<p>주민등록번호: <input type="text" name="ssn1" maxlength="6"> - <input type="text" name="ssn2" maxlength="7"></p>
<p>우편번호: <input type="text" name="zipcode" maxlength="5" id="sample6_postcode"> <input type="button" onclick="sample6_execDaumPostcode()" value="우편번호 찾기"></p>
<p>주소: <input type="text" name="address1" id="sample6_address"></p>
<p>상세주소: <input type="text" name="address2" id="sample6_detailAddress"></p>
<p>참고사항: <input type="text" name="address3" id="sample6_extraAddress"></p>
<p><button>가입완료</button> <button type="reset">다시작성</button></p>
</form>
<script src="./js/regist.js" defer></script>
<script src="//t1.daumcdn.net/mapjsapi/bundle/postcode/prod/postcode.v2.js"></script>
<script>
function sample6_execDaumPostcode() {
new daum.Postcode({
oncomplete: function(data) {
// 팝업에서 검색결과 항목을 클릭했을때 실행할 코드를 작성하는 부분.
// 각 주소의 노출 규칙에 따라 주소를 조합한다.
// 내려오는 변수가 값이 없는 경우엔 공백('')값을 가지므로, 이를 참고하여 분기 한다.
var addr = ''; // 주소 변수
var extraAddr = ''; // 참고항목 변수
//사용자가 선택한 주소 타입에 따라 해당 주소 값을 가져온다.
if (data.userSelectedType === 'R') { // 사용자가 도로명 주소를 선택했을 경우
addr = data.roadAddress;
} else { // 사용자가 지번 주소를 선택했을 경우(J)
addr = data.jibunAddress;
}
// 사용자가 선택한 주소가 도로명 타입일때 참고항목을 조합한다.
if(data.userSelectedType === 'R'){
// 법정동명이 있을 경우 추가한다. (법정리는 제외)
// 법정동의 경우 마지막 문자가 "동/로/가"로 끝난다.
if(data.bname !== '' && /[동|로|가]$/g.test(data.bname)){
extraAddr += data.bname;
}
// 건물명이 있고, 공동주택일 경우 추가한다.
if(data.buildingName !== '' && data.apartment === 'Y'){
extraAddr += (extraAddr !== '' ? ', ' + data.buildingName : data.buildingName);
}
// 표시할 참고항목이 있을 경우, 괄호까지 추가한 최종 문자열을 만든다.
if(extraAddr !== ''){
extraAddr = ' (' + extraAddr + ')';
}
// 조합된 참고항목을 해당 필드에 넣는다.
document.getElementById("sample6_extraAddress").value = extraAddr;
} else {
document.getElementById("sample6_extraAddress").value = '';
}
// 우편번호와 주소 정보를 해당 필드에 넣는다.
document.getElementById('sample6_postcode').value = data.zonecode;
document.getElementById("sample6_address").value = addr;
// 커서를 상세주소 필드로 이동한다.
document.getElementById("sample6_detailAddress").focus();
}
}).open();
}
</script>
</body>
</html>


